Hello people!! Happy New Year!!
Starting my first post with a how to cause I'm too busy to edit my photos for my long overdue Christmas post. Been as busy as a bee.
As the title has suggested, today's post is a How tos of Purikura machine!!
Starting my first post with a how to cause I'm too busy to edit my photos for my long overdue Christmas post. Been as busy as a bee.
As the title has suggested, today's post is a How tos of Purikura machine!!
My obsession with
Purikura crept back just recently and I was superfragilisticaspialidociously
eager to try it when I had a reason to go to Mid Valley, I did just that. This
is not my first time trying Purikura, previously in 2015 when Isetan had some
Japan Culture Fair, there were two Purikura machines which I tried though I
don’t remember the machine names and then during my company events they rented purikura machines too.
The word “Purikura” is a combination of two words,
Print + Club which is Purinto Kurabu and then shortened to PuriKura.
You can find the Purikura machine at Aeon's Molly Fantasy or Cobay's archade. This one I went to is at Mid Valley. Other places in Klang Valley include Aeon Shah Alam, Cobay Berjaya Times Square, Aeon Cheras Selatan, Cobay The Mines and Aeon Metro Prima and the Purikurad theme that are currently available in KL are the Me Her Jyoshi3, Oh My Girl and another one I can't tell the name from the blurry picture online. Gonna try them all and update you!
Unfortunately, there is only one type of Purikura machine, the Me Her Jyoshi3 by Puripix Malayia in MV. I
was hoping there were at least more if not two, but nevermind!
And let's begin on the steps to use this Me Her Jyoshi 3 Purikura!
Step 1
First, I went to get my coins, all 13 of them for RM13. For
that price, I think it’s pretty reasonable and you can even share the fee with
you friends if there are two or more of you. The minimum printouts are two but
with Me Her Jyoshi3, you can print 2,4, 6 or more (If I remember correctly!
Will update when I try again). Of course, the number of printouts differ with
the type of machines.
I am not sure if the height of the printout will differ if
you choose 4 or more BUT the size of the photo will decrease with more than 6
printouts. So IMO it’s best to take Purikura with max 3-4 friends unless you
don’t mind the size. Optionally, just take more than one Purikura. It’ll be
super fun!
Step 2
Get into the cubicle! Each type of machines offer two cubicles,
enter whichever. Here are how the cubicle looks like for Me Her Jyoshi3. Most
machines have somewhat similar cubicles with each has a spot where you
can place you handbags, shopping bag aside while you snap away conveniently.
The camera
Enter the coins and you’ll all set to start!
It's selecting options for your photos from
the eye size and skin color and then the background you prefer once you press start.
I chose the center one which is recommended. For one, I
prefer natural look but if you want to look fairer, feel free to choose the
lightest option. It’s Japanese girls favorite option, so it seems from their
Instagrams LOL
Step 3
After that you have a choicr of selecting between Cute/Kawaii or Cute Cool/CawaCool. I chose the latter cause I love Otona style but the background options are still super kawaii nevertheless.
Step 4
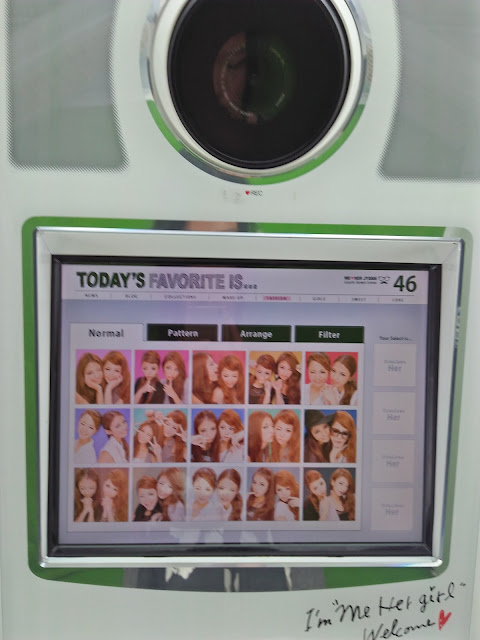
For background, you can choose 4 types from Normal, Pattern,
Arrange & Filter. These are the options for the CLOSE UP SHOT.
I don’t remember what I chose, but I think they’re mostly
from the last 3 tabs cuz the plain ones are too plain but you'll see in a bit LOL
Step 5
Once selected, it’s time for the photo session so get ready to pose!
One tips, in case you don’t have ideas to pose, you can follow the ones flashed on the screens for every shot OR get inspiration from the selecting tab OR the internet. If you want other ideas, I’ll be happy to share them on my next How To Pose for Purikura post.
I didn't follow the poses since I'm doing #SoloPuri while the screen only demo poses for two.
At this point, I didn’t take much screen photos because
there were little time between the shots. The first four close up photos just went snapsnapsnapsnap
After taking all near shots, it’s time for the 2x FULL BODY SHOTS. Again, you will need to select the backgrounds and snap away!
And you get another bonus full body shot for the collage! Unfortunately, it is not included in the phone download (get to there soon) ... I like that bonus full shot photo better compare to the second one above :(
Step 6
Once completed, you will be prompt to head RIGHT/LEFT
depending on what’s stated on the screen to proceed to DECORATING you shots!
Again I don’t have pics because I initially thought I was
given just a few seconds but I had bonus time to decorate. My decors are
simple, just wordings aplenty because most of the background I chose have
pattern, which saved me time considering I was decorating alone and I am
satisfied with just dates & names alone.
At the bottom of each corners, there are four-five tabs
which you can choose from stamps, words, etc. which has another set of 5
sub-tabs to choose from! There are also four-five round circles which you can
choose to alter the size of stickers/decors.
Here is a photo before I edited it.
Here is a photo before I edited it.
Once you’re satisfied with decorating one, go to the center top of the screen and choose the next photo you want to decorate!
Step 7
When all is completed, click done and this will bring you to
another page. From here, choose the numbers of printouts you prefer. Based on
that, you can select the types of layouts you prefer for the individuals
prints! This doesn’t apply if you click the ‘more’ options I think.
And that is it!
Now it’s time to get your prints and while waiting, try to complete the impossible-to-complete Old Maid card game, Gyaru version.
Now it’s time to get your prints and while waiting, try to complete the impossible-to-complete Old Maid card game, Gyaru version.
Tadaaa~~ These are my prints~~ One of the best part is the prints came out pre-cut, so there is no hassle in finding scissors LOL. My first Purikura didn't have this function and it was frustrating.
I got lots of compliments for these hehehe #photoshoptothemax
As you can see, I have chosen two different layouts. With only neutral/recommended settings my skin’s so fair and eyes so huge already, goodness!
And yeah, I should have decorated the one in the film style tho, looks empty LOL My other regret is I didn't try the Kawaii setting...Well, soon!
As you can see, I have chosen two different layouts. With only neutral/recommended settings my skin’s so fair and eyes so huge already, goodness!
And yeah, I should have decorated the one in the film style tho, looks empty LOL My other regret is I didn't try the Kawaii setting...Well, soon!
~❤ ~
Hold your horses!
That’s not all, in one of the last options, you can choose
to have TWO PHOTOS with NO DECORS downloaded from your phone for FREE! All you need to do is
download Puripix app and enter the 16 digit at the bottom of your printouts. By the way, there are TWO 16 digits, so use both and get at least THREE photos FREE!
All your other shots are available to download for a fee.
It's another RM3.50 per coin _ or RM3.15 per coin when you buy 6 coins_ you get to download six photos EXCEPT the one bonus full body shot.
I read some reviews complaining about having to pay an extra fee to download so my suggestion is to download only group pics so you can split the cost which comes down to 80 cents for a group of four or simply memorable friends/family/couple ones. If you ask me, I think the price is OK for the photos came out pretty clear like the ones above (Yeah those are bought).
By the way, there is a TIME LIMIT of about a week to download your Purikura before they are erased from the system. You have been WARNED!
So yes, that concludes my post! I hope you people have fun
taking photos at the Purikura machine! As for me, I’ve been showing off my pics
to my close buddies & bffs and we’ll be taking purikuras together YAYYYY!!


Post a Comment